Saturday, September 15, 2012

RC Digital Magazines - RC Model World

The first magazine I'll be talking about is RC Model World. this is a UK based magazine established over 20 years ago that now features a free plan and over 115 pages per issue. I first found out about this title when I was looking for information on the Grauper Yak-11 Reno Racer ARF of Czech Mate. I found that RC Model World did a review on it in their May 2012 issue. I purchased that issue on my iPhone and enjoyed the magazine. I wanted to base my review on the experience with an iPad, so I will be officially reviewing the August 2012 issue.

Overview

RC Model World is a fine magazine. It's large. The August 2012 issue was 124 pages with 37 of those (~29.8%) pages being advertisements. (others' count might be different as the judgement of what is and isn't an advertisement might come into question, but this number reflects my opinion) There is a lot of great event coverage from the UK with lots a great pictures of fantastic models. I loved the two aerodynamic articles, one about flying older biplanes and one speaking to tip stalling.


I do have a few things that struck me odd about some of the articles. In the new kits and accessories section, they mention both the FMS HS-123 and FMS Stearman. Both of these models have been released by FMS  at the very beginning of this year and were announced many months before that. Another dated item I noticed was a feature article on the Hitec Aurora 9 which started shipping in Oct of 2009. Finally, there was a feature article on the Hanger 9 RV-8. To give you an idea on how long this model has been out, Jim Booker created the review video from Horizon Hobby before he retired. The review video was published on YouTube on April 9, 2009.

Are the older items in the feature article there on purpose? Are they trying to review and talk about models that have slipped through the cracks? All of those items are cool, but I personally don't buy RC magazines to hear about 3-4 year old products.

Use of Technology
I give RC Model World 1 star out of 5 in this department. The one star is there simply because it's digital. There's not much to discuss on this point because the digital version is simply a "pdf-like" version of the printed magazine. There is no video, slide shows, audio, clickable links, or slide shows. When you view the magazine in portrait mode, you see each page and if they had a picture spanning both left and right pages, you'd only see half. When rotating the tablet to landscape, you see both left and right pages as if you were reading the printed version. This seems nice at first but I found myself having to zoom in on a lot of text to even read it.


Another item I failed to see were the free plans. I figured there would be a cool easy way to see the plans (that would be included with the digital version) and maybe an option to print. Unfortunately, I did not find any information or mention of the free plans to coincide with the digital version. I have written the editors of the magazine with a few questions and I have not received a response. I will update this review accordingly if I do hear anything.

Content
I give RC Model World 3 out of 5 stars in this area. The event coverage is great and I really enjoyed the technical articles. The reviews were on par with the typical RC magazine. I wold have given them 4 stars if it were not for the older products discussed. I do want to convey that I enjoyed reading the articles.

Ease of Use
2 1/2 out of 5 stars for this category. This digital magazine reads exactly like a printed version. If you want to jump directly to page 100, you have to either page-turn 30-40 times or click the screen to bring up a smaller scroll wheel at the bottom to scroll to the desired page. There is no navigation outline or ability to tap on items in the table of contents to jump directly to a page. That being said, I had no problems navigating and reading the entire issue as they intended. I also think that someone who is not interested in bells and whistles and/or is used to a traditional magazine would have no issues reading through.

Layout / Designs / Looks
3 stars out of 5 for a great looking typical RC magazine. Lots of great pictures, diagrams, and attractive layouts. That being said, the digital version is exactly the same layout/looks as the printed version. I'd love to be able to talk more about the design, but being that it's no different on the Ipad, I'll leave it at that.


9 1/2 stars out of 20 possible.


Sunday, August 12, 2012

RC Digital Magazines

The popularity of the tablet for digital media is catching on. Unfortunately, the RC hobby is notorious for lagging behind current technology. Maybe I should rephrase that last statement; RC hobbyists are notorious for resisting change. Let's face it, there are still clubs out there full of members that hate anything electric, don't trust 2.4, and do whatever they can to discourage the shift of our hobby's technology to new members, and new pilots. I was discouraged last year when I was trying to find a digital RC magazine for my Kindle Fire. However, it didn't surprise me. I also knew eventually there would be one, so I had to wait.

Just before Toledo I began to hear about RC Pilot Magazine which was going to be completely digital. I was very excited to imagine a real digital magazine and not simply a PDF of a printed magazine. I was disappointed, however, that it was only available for the iPad. Oh well, I might eventually get one. At the Toledo Weak Signals show, I walked up to the RC Pilot booth and expressed my appreciation for their magazine and I was pleasantly surprised when they informed that it would be soon available for the Kindle. SWEET!

Fast forward to present day. There are at least four major digital RC magazines out and I figured this would be a great time to review each of them.


(I admit it, I do love RC magazines. I don't deny their short comings and I actually make fun of them most of the time, however I can't stay away.) I'm also exploring advertising for ATTF and I figure that a digital magazine is the perfect place targeting the perfect demographic that we're looking for. I'll be doing this in a 6 part series. Part 1 is this introduction, one part for each magazine, and finally a conclusion.

Anti-Shill Disclosure

As a host/owner of the AllThingsThatFly.com podcast, I did interview Michael Kranitz, owner of RC Pilot magazine recently and they have donated a prize to one of our giveaways. I am a paid subscriber and I am in no other way affiliated with RC Pilot. Regarding Model Aviation, I am an AMA member and that's the extent to my relationship with them. I have absolutely no ties to the last two titles which I have reviewed. Besides my paid subscription to RC Pilot, I have purchased the individual issues of the other magazines I will be reviewing.

Review Guidelines

I am using the following criteria to review the magazines:

  • Use of Technology
I'll be looking at all of the bells and whistles the magazines utilize to set them apart from a fancy PDF. In-line video, animation, creative slide shows, links, audio, etc etc. I'll also compare what the magazine claims to offer compared to what's actually inside.
  • Content
I'll be judging on the quality of the articles. Granted, this doesn't have much to do with the magazine being digital, but it's a key factor in any magazine. If readers don't enjoy consuming/relating to the actual information, it doesn't matter how many cool features the magazine has.
  • Ease of Use
How hard is the magazine to navigate? Does everything work? Do I become agitated at anytime during the read?
  • Layout / Design / Looks
Finally, I'm going to rate each magazine on how it looks overall? Do I enjoy looking at it? Is it pleasant to read? I understand this can be a very personal area, but I feel it's warranted.

Look for the following parts of this review in the coming weeks. Use the label "Digital Magazines" here in my blog to just bring up the posts for this review.

Small ARF Build Part 3, Extreme Flight 48" MXS EXP

Part 3 is going to cover what can be the most time consuming, nerve racking, and important processes when building an ARF. Gluing in the horizontal stabilizer perfectly spaced and perfectly aligned. I think the importance of this step is often not realized and modelers often end up with a misaligned stab & elevator which will lead to unusual flying habits. Check out the last section of Scott's article Assembling your new ARF to read his explanation and tips on "Squaring The Tail"

One model-specific thing to note with this MXS is that before you even get to the alignment of the stab, you have to make sure to install the elevator UPSIDE DOWN FIRST before sliding the stab in. (see pic below taken from the official assembly manual) This is due to the large counter balances on the elevator and the fact that they're larger then the opening for the stab, so you need to slide it in at an angle. Once inserted into the fuselage the elevator can be rotated 180 degrees and placed in the proper location. 


After the elevator is in and rotated correctly, slide the horizontal stab into place. This is where the fun begins! The first alignment process is to make sure the stab is aligned with the main wings. I've found that using the wing tube is the easiest way to do this. Insert the wing tube and hold up the tail while looking a the plane from behind. Visually line up the stab and wing tube. From here, you'll be able to see if it's aligned or not. If it's not aligned, then you'll either have to add some shim material (I usually use strips of cardboard) or sand down the material opposite of the shim. You might get lucky and not have to do anything. You might only need to shim...or you might have to shim AND sand. About half of all ARFs that I've build have needed some adjustment here, so be prepared. Not fixing this can lead to unexpected traits during pitching of the plane in flight. Attempting to remedy this after the stab have been glued in place would be a nightmare so taking care of it now is the best bet. This, unfortunately, is the nature of the ARF beast.


After you have aligned to the wing, you need to square it with the wing. I've heard of some people measuring from the front tip of the horizontal stab to the end of the wing tube. This seems like a good idea except you should keep in mind that unless you remember to get the wing tube exactly centered in the fuse, you'll never get the measurements correct. I suggest attaching the main wings at this point and measuring from the same point of each wing, to the same point on each stab half. (corner or end hinge line are examples) For me, this is the most time consuming part. I find it helpful to measure each half of the stab to make absolutely sure it's centered in the fuse. After that, I take a tape measure and start adjusting until I get the exact same distance from the wing to the stab on both sides. You'll find that you'll figure out what the magic measurement is, but the hard part is getting it! 

Once everything is perfect, put a few drops of CA on the stab to lock it in place. Now you can fully glue the stab in with CA. Congradulations! You're done with what I think is the hardest part!

The last thing to do is attach the elevator with the supplied CA hinges using the same method we used on the ailerons.


Friday, July 20, 2012

Wings Across America Pilot #350


In case you don't know about Wings Across America, go ahead and visit this link: http://www.waa-08.org/

The following is a brief explanation of the program taken from the official description of the project:
A group of model airplane enthusiasts will fly a battery powered radio controlled airplane called
a ParkFlyer in all 48 contiguous United States.  The name they have given this adventure is
Wings Across America 2008 or WAA-08 for short.  What sets this project apart from all the
others ever attempted or completed is that the pilots will hand deliver the plane from pilot to
pilot.  The plane will never be shipped by mail to its next destination.  This method will be
creating a "chain" of pilots that will fly this model airplane all across the United States and back
to the starting point.  Upon completion of the adventure, the model airplane will have flown in
48 states and cover a distance of over 25,000 miles.  The plane will end her journey at home field
about 5 years after it made its maiden flight in eastern Virginia.  Currently, 356 pilots have
registered to take part in this history making project as well as 246 Academy of Model
Aeronautics (AMA) Chartered clubs are hosting the adventure as the plane makes its way across
the United States of America.
WAA-08 is the creation of Frank Geisler of Gloucester, Virginia.  Frank is an avid RC pilot,
USAF veteran, and AMA leader member who volunteers his free time to help promote the sport
of model aviation.  When Frank discussed this project with some of his friends it was received
with such enthusiasm that the project was born of this energy.  All that was needed were to find
hundreds of RC pilots across the US and in every state willing to fly the plane at their home field
then drive to the next pilot, thus forming a nationwide network of pilots who would fly an RC
airplane across America. The RC community is always looking at ways to promote the hobby
and introduce the fun, excitement, and learning opportunities this hobby has to offer to young
adults.  This is an excellent way to showcase this hobby to a lot of young Americans.
 
I had been hearing about the project for some time from various media outlets and knew that it had already been near the Cleveland, OH area, so I just followed with interest whenever I would hear about it. I never thought I'd be able to see and hold the plane, let alone fly it or become an official WAA pilot. The story starts when I visited my good friend Jack who had been repairing a plane for me. I pull into his driveway and he immediately says, "moose, I've got something to show you..." He opens his tailgate to reveal the WAA box.

I knew what it was right from the get-go and grabbed my camera so I could get a picture of myself with it. He then proceeds to tell me that he needs to get it to Columbus to the next pilot. I could not believe what I was hearing, because in two days time, my family and I were going to be heading to Columbus ourselves to visit COSI and the Columbus Zoo! One thing led to another and I pulled out of Jack's driveway with the WAA plane in the back of the Forester.


After contacting Frank and letting him know what was going on, I quickly made plans to visit my home field of the Flying Aces of Aurora, AMA Chartered Club #4859. There's really nothing exciting to report on the flight. The plane flies like any well designed 3 channel trainers. It handled the 5-8 MPH winds just fine. It was a privilege and an honor to put a flight on the Steven's AeroModel Squirt.

The closing of my personal chapter of the WAA journey ended in Columbus, OH when I met up with pilot #351 Michael See to transfer the plane.


I did adorn the travel case with my name and a brand new ATTF sticker. (created by NachosCheese Graphics) It's an exciting thought to maybe see that same case and plane behind glass at a museum. Is it wishful thinking that it might end up in the Smithsonian Air & Space Museum? Pilots ARE dreamers, right?


Saturday, July 14, 2012

Showing RC to Cub Scouts

On June 28th, Jeff Maruschek from the AllThingsThatFly.com podcast, along with Bobby Roarison, and Dave Bondi from Austintown Hobby Shop visited the Breckville Cub Scout Day camp to provide after-lunch entertainment for around 140 cub scouts. The goal was to give the scouts a quick glimpse of what RC is about, the equipment we use, how it works, aerodynamics, and examples of planes ranging from ultra-micros up to a 100cc 3DHS AJ Slick. This afternoon's fleet consisted of  8 RC models including 2 30cc sized planes, 2 50cc sized planes, and lastly, a 104" 3DHS AJ Slick powered by a DA 120. Due to the small field size, a few smaller foamies were also brought for some flying demos.


Jeff led the demonstration with a quick overview of the hobby in general. Topics included current radio technology, AMA safety regulations, model sizes and costs. After some questions, the guys wanted to explain how the planes actually fly and how they're controlled. Jeff would explain each channel on the radio while Dave would move the appropriate surfaces on a 71" 3DHS AJ Slick. 


Next, the guys gave a quick flying demonstration with some 3D foamies. Bobby took to the skys showing some general flying and then quickly progressed into some extreme 3D maneuvers. "Bobby's a much better pilot then me, so watch him make the plane do things you'd never expect a plane to do!" Jeff said to the kids. The flying led to another round of questions, however this time it was noticed that more of the fathers were joining in and asking questions!


In the end, the trio kept the 140 scouts as quiet as they had been all week! The administration could not believe how attentive the kids were for the entire demo. There are, however, a few things the guys learned for next year's demo. "This year was more of a last minute thing that turned into a "shock and awe" display for the kids. Next year we're going to concentrate more on trainers, good first models, and buddy boxing" says Bondi.


Friday, June 29, 2012

Small ARF Build Part 2, Extreme Flight 48" MXS EXP

This next part is going to be a simple and straight forward one. I'll go over installing the aileron servos and setting up the pushrods along with installing the landing gear, wheels, and pants.

Before you install the servos, it's best to have some sort of servo tester or have your radio and Rx on hand to center your servos before installation. I use the G.T. Power Professional Servo tester to center mine.


You can also hookup your radio and Rx with a receiver battery pack. Either way, you want to get the servo centered with the tester at a PWM setting of 1500uS or with no trim or sub-trim with your radio. With the servo centered, install your arm at 90 degrees from the servo itself. If you have problems getting the arm exactly at a right-angle, then try rotating the arm 180 degrees and using it for the other aileron. My Savox servos had no problem.

Now you can install the servos into the wing. On this plane, make sure that the output shaft is positioned towards the trailing edge of the wing. A quick tip here would be to install the servo, and then remove it. To harden the balsa wood, place a drop of thin CA in the screw holes and let dry.


On most planes, there are some pieces of string run through the wing that you use to pull the servo leads through. However, on this model, there are none. I was worried at first, but after about 30 seconds I realized that the wing is small enough that you don't even need an extension to reach the root of the wing. It's quite easy to run the lead through the wing so you should have no problem here.

After the servos are installed, it's time to setup the ball links and the push rods. Here's a tip that for many will be common knowledge, but just in case, here it is. At this point, use some blue painter's tape to tape the ailerons even with the wing. This makes sure the ailerons are straight during setup. Similarly, use your servo tester or radio to keep the servo you're working on centered during this step.


Screw on the ball links and use trial and error to get the assembly the correct length with everything centered. Use the bolt with washer and nut on the other side of the control horn. Tighten everything and use either some blue loc-tite or medium CA on top of the nut to secure. Your ailerons are now setup!


The landing gear and wheels are rather straight forward. The instructions are great and I didn't have a problem tightening the axle while inside the pant. Since the instructions are so good for this step, I'm just going to quote them:


Place the wheel onto the axle and secure with a wheel collar. Place the threaded portion of the axle through the hole in the carbon gear and screw the lock nut onto the axle, but do not tighten completely. There is a slot pre-cut in the wheel pant to allow it to fit over the axle. Before installing the wheel pant place a drop of silicon based glue onto the wheel pant just above the pre-cut slot. This will prevent the wheel pant from rotating, but allow it to move in the case of a mishap which may help to prevent damage. Slide the wheel pant into position over the axle and tighten the nut on the axle, taking care to make sure the wheel pant is positioned properly.

 This ends part two of the build log! Thanks for checking it out!


Friday, June 22, 2012

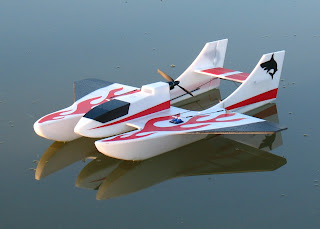
West Michigan Parkflyers Mako Sea Plane

For episode #232 of the AllThingsThatFly Podcast, I interviewed John Van Baren who has designed a new plane for West Michigan Parkflyers. Since the plane is about to be listed on their site for sale, we figured we'd post these pictures here now so listeners can follow along with the interview.


Specifications:
Wing span – 32”
Length – 35”
Wing area 310 sq in
Weight - (without battery) – 13.5 oz      (with battery) – 18 to 22 oz
Center of gravity is 12 ¾” from tip of floats
Motor: 2212 – 1900 KV or 2212-2200 KV
Prop: 6X4E or 6X5E
Battery: 1500 mah to 2500 mah 11.1 V (2200mah is a good size with a 9min flight time)
Speed Control: 30 or 40 Amp


Thanks so much to John for coming on the show!


Saturday, May 26, 2012

Small ARF Build Part 1, Extreme Flight 48" MXS EXP

So in preparations for building the 1/4 scale Gilmore Red Lion, I wanted to get a box out of the way and decided to put the 48" MXS from Extreme Flight together. To follow along to just my posts on building this MXS, use the Topics to the right and click MXS and you'll see only the posts related to building this model.


Before I begin, I strongly recommend reading this article by our friend, Scott Stoops. Assembling your new ARF. I'll refer to this article at some points, so bookmark that and jump to it if needed.

SETUP:

I'm usually like going with the recommended setups for high performance aerobatic planes, so I ordered the Torque 2814-820 motor. However, I have a Castle ICE lite 50, so I'll be using that. For servos, I'm mainly a Hitec guy, but because many people are suggesting using a larger servo for the elevator on this plane, it gave me a perfect opportunity to try out Savox servos. I'll be using Savox SH-0255MG digital servos. These will give me the more power on the elevator without having to enlarge the opening for the elevator servo. (and not mention save a little weight) EF calls for an APC 12x6 but I don't have one right now, so I'm going to use a Xoar 13x6.5 and watch the motor temps on the first few flights.

FIRST STEPS:

Scott Stoops recommends going over the covering and re-shrinking first thing. My model was in VERY good condition and I just quickly went over the whole plane with an hot air gun. I really didn't need to, but thought it wouldn't hurt to just tighten everything a bit.

Next, Scott talk about covering reliefs. These are the holes in the covering where you mount servos, run the wing tube, anti-rotation pins, etc etc. On most ARFs, this is not done, but I have to give EF credit for having this done already. Even hot air exhaust holes on the bottom of the fuse are cut out already. I got to skip this step!

ASSEMBLY BEGINS:

The manual has you begin on the wings first. Gluing in the aileron control horns is very straight forward. Before you do, look at all of your G10 control horns that come with the plane and one will have a slightly shorter tab. THAT one is for the elevator. If you do use it elsewhere on accident, it's not that big of a deal because you can always sand down the one you end up using. To glue these in, just make sure you sand/scuffs of the G10 to give your adhesive a better grip. The manual says to use medium CA, but I used the white gorilla glue. No problems here.


Next is hinging the ailerons. The manual doesn't mention T-pins, and I really like using them to make sure the CA hinges are centered. So check out Scott's article and the section entitled "Flight Control Hinging". Scott describes perfectly how to hinge the ailerons and this is exactly what I did.


All that is left is to remove the pins and drop some thin CA on the hinges and make sure you're getting the throw that you desire.

That's it for part one. Next post will have installing the aileron servos and setting up the control linkages.


Monday, May 21, 2012

ATTF March Giveaway Drawing

Hey everyone! I just wanted to first apologize for taking so long to do this. A very busy April and May didn't allow us to pull the winner for the Velocity-RC Voltron GPS Logger until now.

Due to conflicts and bad luck, we weren't able to hook up with Fred to help with the drawing this time (pretty much all Moose's fault) so I enlisted the talents of 4 year old Izzie to pull the winner. Congratulations to Roger Bohn of California!


Thanks again to Velocity RC for sponsoring the ATTF March Giveaway!


Thursday, March 22, 2012

FMS HS-123 Conclusion and Flight Report

I'm going to split this up and talk about the build and then flights.


Building was pretty much straight foreward. I have now decided that I'll be using Welder's Glue on all EPO planes. Just throw away the stuff that comes with the ARF.

The plane itself goes together rather nicely. However, as with every single 1400mm FMS plane I've owned (4) the wiring resembles a rat's nest and can be a little daunting. Due to the way the wires run to the ailerons and flap servos, you need to run a few long servo runs. Here are my building suggestions:

  1. Setup your Rx and center your internal servos and tail control surfaces BEFORE you attach the bottom wing.
  2. Mount and bind your Rx before you attach the bottom wing.
  3. Test fit your battery and be prepared to cutout some foam to fit a 3S 2200 pack in there.
  4. Keep some servo wire slack inside the carbanes so you can have some room to remove the wing a bit if needed.
  5. Reinforce all seams of the fuse halves with your glue. Mine were glued fine, but I saw some play, so I didn't want to take any chances.
  6. Remove the motor and reinforce the firewall everywhere you can. There have been some reports of the firewall coming looks without this step. Also, this give you a chance to make sure the motor mount screws are nice and tight. 
  7. Secure the small bombs with just a tack of CA to make sure they don't fall off in flight...but not so much that you'll never be able to remove them. (Two of mine fell off on landing)
  8. Find some thick black thread and wire up an antenna between the vertical stab and the pole. There is a little hole in the pole to tie the thread around. It's amazing how much better the plane looks with the antenna.
The plane comes with grey stickers to cover the servo wire channels on the bottom of the plane. I've left mine off because I've had to remove the wing a few times to make adjustments. Also, don't be afraid to remove some foam from the battery compartment if you want to use a 3S 2200.


This plane flies like a prop-driven biplane. It's as simple as that. The landing gears being rather close together means that the plane will tip over on a wing if you do a doughnut. Be prepared for some runway tattoos. Many pilots have bought or made some plastic guards to go on the bottom wingtips to help prevent any damage to the EPO foam. Landings are easy especially with the flaps, however, once it's rolling, the ground handling is not very good at all. Each one of my landings were near perfect, and once it starts rolling, it gets out of control and either turns one way and skids to a stop or goes right into a ground loop.

Lead turns with the rudder! I've found that to make GREAT looking scale turns, lead with the rudder, and most of the time you don't even need to add aileron....in fact, you'll more then likely to hold in opposite aileron (as expected)

Not a ton of power with this one. (as is par for the course with stock FMS planes) However, it does great flying scale and there is no doubt that this plane LOOKS AMAZING in the air and will defiantly turn heads at the field.

I'm happy with the plane and I'll be keeping it. I don't think it will handle wind very well as 7-10 mph winds were blowing her around quite a bit, so she's defiantly a great candidate for Dawn Patrol.


Pros:
  • Looks amazing
  • Scale details
  • Great scale flight
  • A nice size to fit in your car
  • Inexpensive

Cons:
  • Ground handling is not very good
  • Lots of wires, not a lot of room.
  • No easy access for Rx and internal servos
  • Wings are not easily removed
  • Not great in wind

FMS HS-123 Build Photos - Part 2

Here's part 2 of the pictures. See my next HS-123 post for final pictures and my conclusion after getting about 4 flights on this plane.


FMS HS-123 Build Photos - Part 1

Hey everyone! I just wanted to post the pictures I took while building the FMS HS-123 purchased from www.pw-rc.com.

Here is all the hardware that comes with the ARF. Some items are labeled, however myself along with other HS-123 owners have found that the carbanes were labeled backwards.


Next is a series of pictures on how the plane comes together. If you have the plane, you should be able to follow along with my pictures along with the included manual for guidance when building the ARF.